Showing posts with label bit crusher. Show all posts

Friday, August 20, 2021

Analogish bit crusher

 I just came across this great post about an analogish bit crusher and sample rate reducer from Juanito Moore and Kristian BlĂ„sol in the Synth-DIY group on facebook:


When I made my mcu-based bit crusher I was thinking about doing something similar but couldn't think of how to do the actual bit crushing - this solves that :)

But that got me thinking - could we do away with the ADC too?

Turns out we can of course. By making a flash ADC using comparators for example:


Instead of the 8-to-3 line encoder we could put D flip-flops and clock them, to reduce sample rate. Maybe we could even find a way to re-use the flip-flop as a switch, to combine it with the bit crush-comparator outputs? D flip flops with preset and clear seem able to do this as long as preset/clear are level controlled, not edge.

We can also use the 40174 hex D-storage, which stores 6 bits of info (but does not have a preset though)

If we want to go all-analog we could instead use sample and hold buffers for the bits, though we may not be able to have a combination of both very high and low sample rates as the leakage during hold vs charge time during sample may be incompatible. This could be improved by using a second set of comparators on the output of the S&H so that a voltage drop won't be visible on the DAC side of things, but now things start getting a bit complicated :-D


All in all not a terribly practical project, but fun none the less.

Friday, December 4, 2020

Tons of new circuits ready!

So much has happened this summer and fall, and I haven't written about half of it! Some of it is directly related to the XM8, but most is utility circuits. I simply decided that I had to take time to do do some intermediate steps before building the final voice cards.

A shortlist of circuits I've designed, breadboarded, tested and finally produced at JLCPCB/DirtyPCBs follows below. Everything has been soldered by my good friend and colleague Stig-Rune!

Analog CV bank with 16 CVs in groups of 4.


For each CV you can select between lin or log/antilog  response, as well as uni or bipolar operation. Per group of four you can select the CV range, 0 to 2.5V, 5V or 10V (or +/-2.5V etc for bipolar). I did fuck up the PCB slightly so I had to cut a trace in three places and solder a wire. Also, I messed up a cable so I shorted the outputs, almost overheating the opamps. After that it worked perfectly. Output is via 10 minijacks and a 10p IDC connector for easy connection to a breadboard.


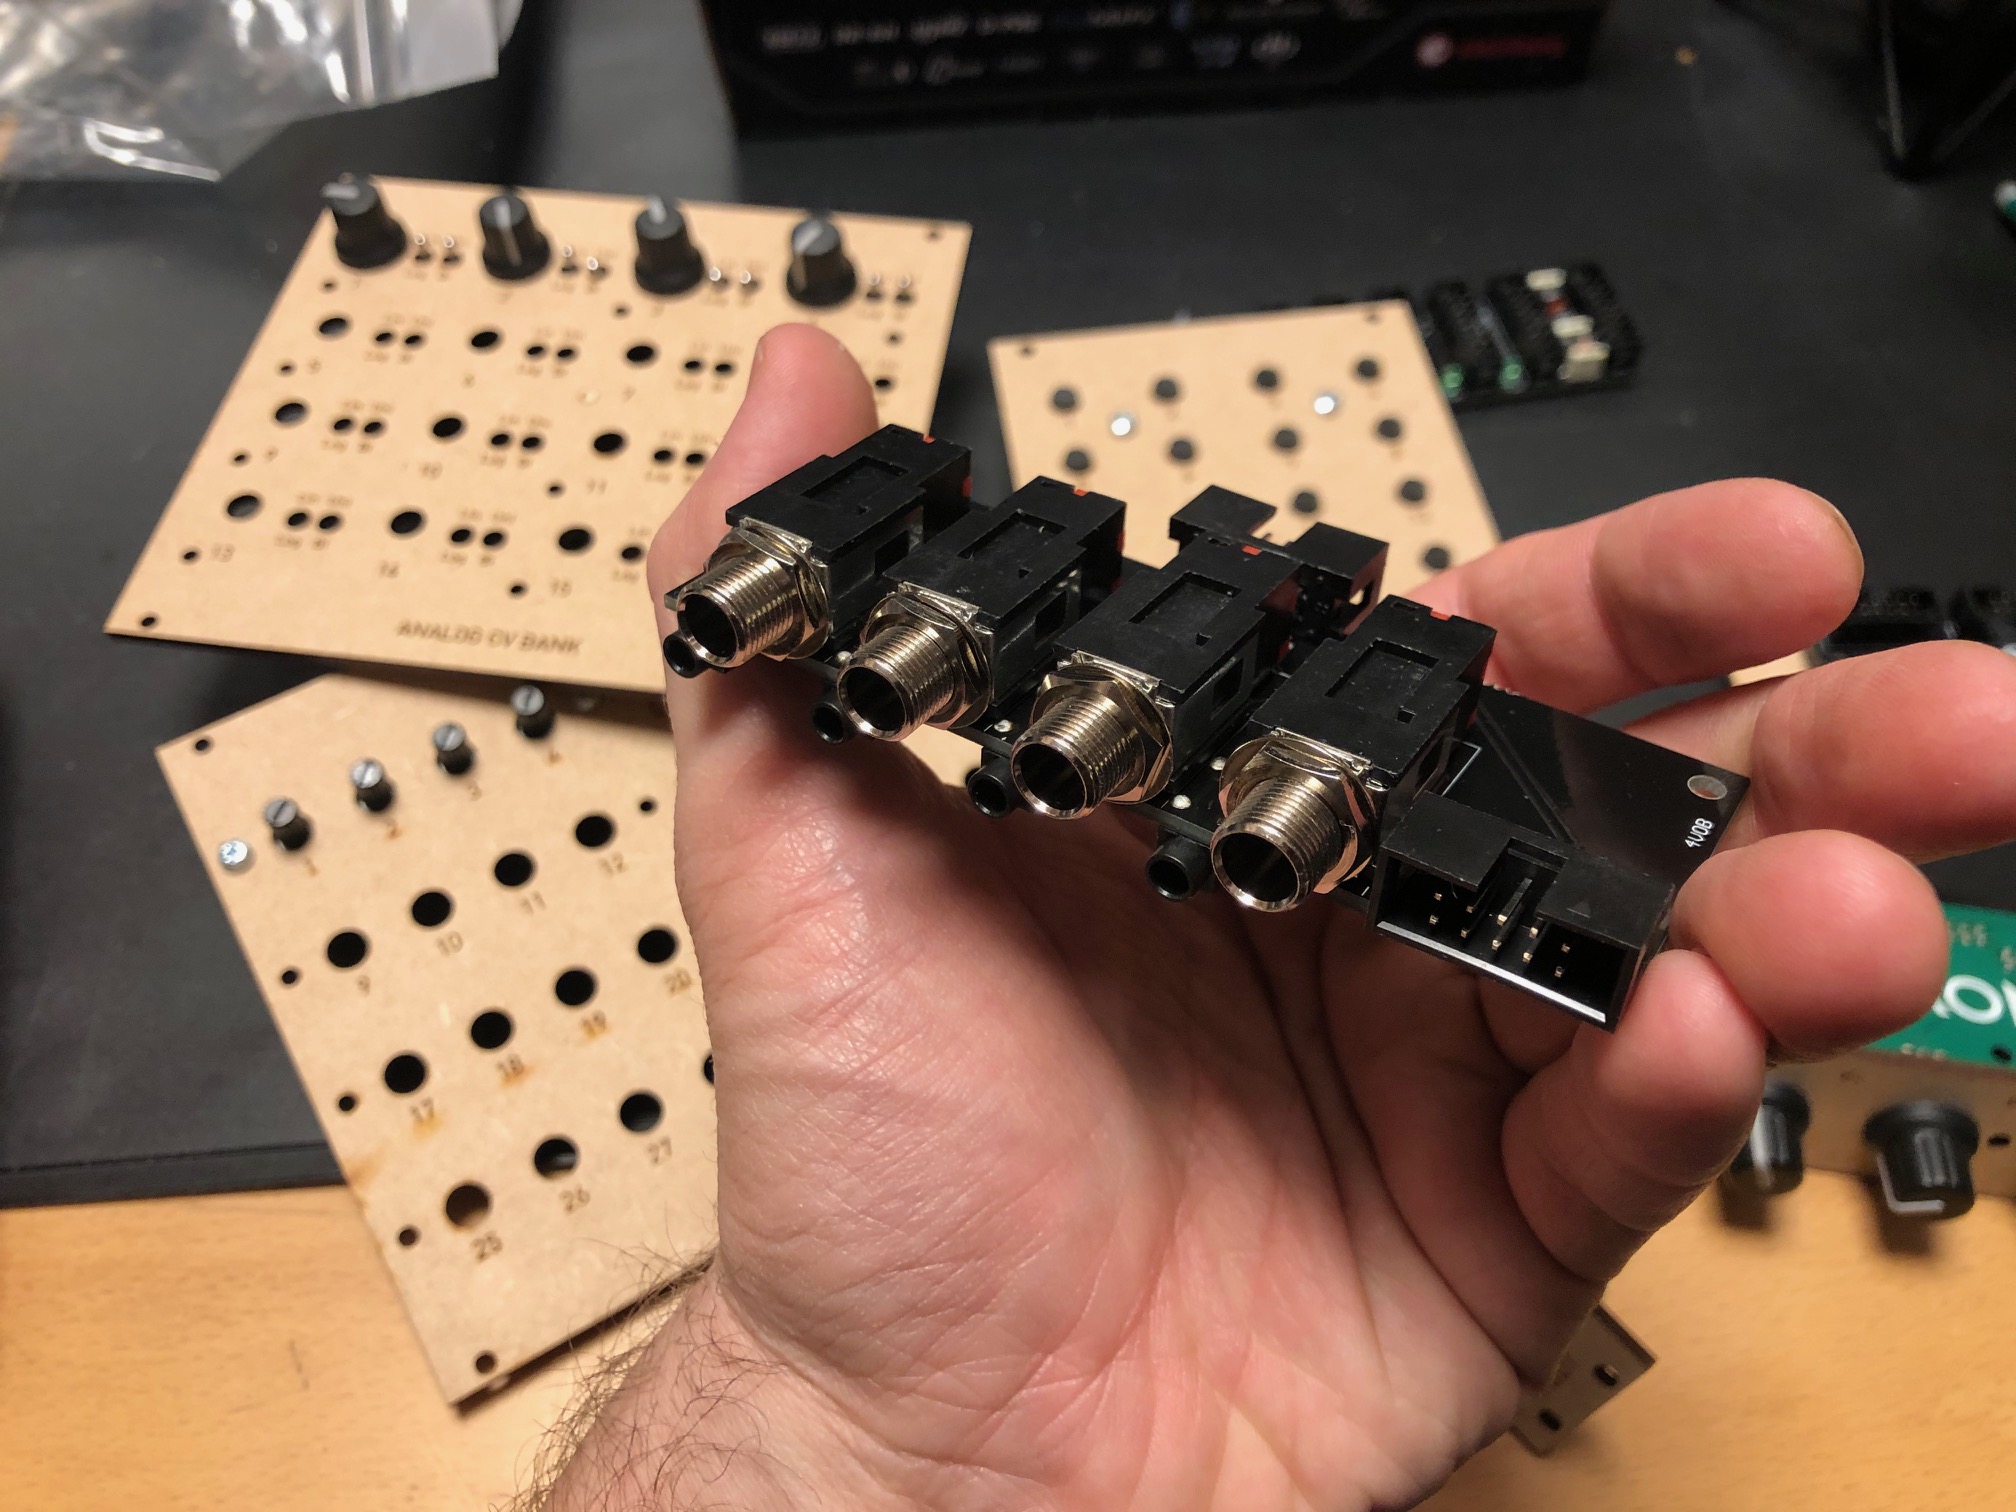
Quad input/output module with 1/4" jacks


For each module you can select input or output connected to the 1/4" jack, and the opposite will be connected to a minijack. Both ends are also connected to a 10p IDC connector for easy connection to a breadboard. For each channel there is an option of 10 or 2 x attenuation and 10 or 2 x gain, meaning you can either have a unity gain circuit, a 5x attenuation (for line out-ish) or 5x gain (for input).


24/48 button module, digital

A digitally scanned button module (without the microcontroller), chainable for up to 48 buttons. Serially read so it only requires four pins + power, making it possible to combine it with the potentiometer module on the same cable.


8 to 64 potentiometers module, digital


A digitally scanned potentiometer module (without the microcontroller). Each module has 8 potentiometers, and 8 modules may be chained for a total of 64 potentiometers. As with the button board, it only requires four pins, and it shares the same clock and reset pins at the button module so a total of six pins + power is needed for all digital modules. During testing I discovered that pin 9 on IC2 - one of the address lines - should have been connected to GND. Now it is floating, so it isn't possible to set the address correctly. It's an easy fix however.


4 x IDC Passthrough module

A simple panel with IDC connectors on both sides, makes it possible to route IDC connectors as a group through the front or back panel without putting the cable through a hole.


Bitcrusher

A combined 12 bit sample rate reducer and bit rate reducer with analog and digital control, based on a PIC16F18446 microcontroller with built-in ADC. Described in separate posts. I've ordered 25 of these.


20kHz LPF

A filter module that can be used as an anti-aliasing filter for ADC input and reconstruction filter for DAC outputs. I use the same configuration in the Bitcrusher and intend to use this for the combined DCO/wavetable oscillators. The circuit comes from this page: https://www.analogfilters.com/anti-aliasing-filter/


Voltage Controlled Distortion

A distortion module for the XM8, the second of the two pre-filter FX (the bitcrusher being the other). Controllable distortion amount and output amplitude, as well as switch between hard and soft distortion. Untested.


Memory


A DIL mounted SMD chip, 128Mbit, for use as sample memory for the wavetable oscillators etc. Untested.


Prophet VS keyboard controller

A new revision of the 68b01 clone for the Prophet VS. I've ordered 20 of these so I have for future sales. They have all been programmed but are missing legs.


Modular synth power bus board

16p Doepfer standard boards with 7 connectors. A bit short but cheap to build.


10p and 16p breadboard IDC connectors

Tiny boards with an IDC connector on one side and legs on the other, making it easy to use ribbon cables between breadboards and modules


Unbuilt designs

In addition, I have PCBs for the following that has NOT been soldered yet:


Breadboard power and I/O module

Has input for +/-15v and a regulator for 5V. Also has IDC connectors for chaining multiple boards, and small chain-boards that can be fitted upside down to connect multiple boards. Connects to the power busses on the breadboard. No more risk of messing up polarities! Also: a 10p Doepfer compatible power connector, although the doepfer uses +/-12V, not 15V, and a 10p I/O connector that connects a ribbon cable to 10 pin headers for easy and stable connections. Pin 10 may be connected to ground with a jumper.


Breadboard coax connector and I/O module

A board with four coax connectors and the same 10p I/O connector as the board above. Will give stable connection points for oscilloscop, function generator and other gear that uses coax.


15-to-12v DC converter module

A module that converts +/-15v from either a molex connector or a 10p IDC connector to +/-12v and +5v. Output is through a 16p connector, compatible with the Doepfer standard. Also has a two pin header for injection of Gate and CV 


All in all 16 different boards! Needless to say, I'm more than pleased! I'm getting so close to being able to test an initial voice board, I just need to program some digital envelopes.


Bonus

I finally got the following soldered and ready for testing:

Two versions of the sample and hold buffer, one with some large caps and some filtering and one in a tiny DIL14 format, both quad sample & hold:


Then the second version of the DCO, this time with DAC output to make it a wavetable oscillator too:


Saturday, November 21, 2020

Bitcrusher tested

I got the bitcrusher from JLCPCB working today. Last week I discovered that some of the tiny 0402 resistors had lifted from their pads, so the input filter did not let the signal through. Last night my wife soldered them (I love her and how skilled she is, those parts are soooo small!), and today I was finally able to test everything.

The left pad of the two 0402 resistors have lifted. Not sure if this happened in production or when the pins were soldered.


I am still surprised at how recognisable the output is at 1 bit 27kHz. It has a lot of noise, but the music is still very audible. I am still not entirely convinced that it does not leak from the input, but when I reduce to 0 bits everything goes silent so I guess it is actually possible,

I had a lot of trouble getting the sample rate high enough, currently the max is at 27kHz with a 1:1 prescaler on timer 1 and a timer start value of 0xFEFF. Changing to 0xF0FF drops sample rate to 2kHz, so it's really sensitive. I need to work more on this but I am fairly confident that 44kHz should be possible.

I still want to confirm that the filters work as expected and have a 20kHz cutoff, but if that works as expected I think I'm ready to mass produce the filter. Perhaps just doing a quick input SPI check first.


Here is my test setup btw, for future reference.


I've also tested the filter response for the input filter. It works fairly well although there are some slightly strange things going on. 

First of all, at 10-15kHz, the output signal (what the ADC sees) is amplified slightly, before it drops towards 20kHz. At 20kHz it is close to what I see in the simulation, so that's great. At 25kHhz it is even lower than what was simulated. There is also some distortion on the sine wave, not much but visible. I'm not too worried though, as this is not a hifi system. The tests sounded good enough to me. I'm more worried about the phase shift I see even at low frequencies, They may be very audible if the signal is mixed with the original. We'll just have to see (hear).

5kHz - no amplitude difference but a slight phase change

10kHz, the output has suddenly increased by 0.2V (5-10%)


At 20kHz we have a very visible attenuation. The filter is designet for 20kHz cutoff

Heavy attenuation at 30kHz


Thursday, July 23, 2020

Quick thought on bitcrusher

The bitcrusher works in two ways - it reduces sample rate and it reduces the bit resolution.

A good quality audio DAC circuit needs a reconstruction filter after the DAC to remove unwanted high frequencies ( >20kHz). When sample rate is reduced, this filter's cutoff must also be reduced to approx twice the sampling rate to keep the quality.

BUT - in a bitcrusher, don't we actually WANT the coarseness caused by not filtering the signal perfectly? I assume so. This has to be tested.

I will try building a bitcrusher with a simple ADC->MCU->DAC->static LPF and see. 

https://en.wikipedia.org/wiki/Bitcrusher

Tuesday, March 31, 2020

Distortion (continued)

After figuring out what was going on in the distortion circuit, I set out to make a nice switchable distortion for the XM8.

Matching hard and soft

Through some experimenting I came up with the following circuit. It has the same amplitude for the output of both soft and hard clipping. Distortion starts at around 10mV input and output is at 3-400mV. Combining these two involves having an additional cap and resistor in the feedback circuit, and the hard clipping circuit has to be attenuated, meaning we should either switch output attenuation or do this in a VCA later.


Matching hard and soft clipping at 20mV input


Various diodes

I tried simulating various diodes. It seems that all silicon diodes (wow, I just realised I've spelt it silicone elsewhere! Blush...) such as 1N4148, 1N914 and 1N4001 give about the same result in the simulation. An 1N34 germanium diode on the other hand clips MUCH softer:


Soft clipping with 1N34 germanium at 10mV

Soft clipping with 1N34 germanium at 50mV


Soft clipping with 1N4001 at 5mV

Soft clipping with 1N4001 at 10mV

Soft clipping with 1N4001 at 25mV

Soft clipping with 1N4001 at 50mV


Matching hard and soft (silicone) without varying amplification or attenuation

The following circuit gives similar amplitude on the output of both hard and soft clipping, without any changes in amplification or attenuation when switching between hard and soft.

I have simulated this with a 31k resistor but that may be changed to 33k without any issue. With a 33k resistor, low pass cutoff is at 26.7kHz with a 180pF feedback capacitor, 32kHz with 150pF.

The input should be at around 15mV when signal is 5V, which will not clip. Soft clipping starts at around 20mV and hard clipping slightly later. Output is around 7-800mV


I've simulated the circuit with two separate opamps but this may be build using only one and with a single SPDT-switch like the DG419:


PS: Connecting the point between each of the two diodes in the feedback circuit changes nothing. That means that we can actually get away with two diodes less, putting the switch at the bottom of the hard sync instead of top.

Here's a closer look at the effects of clipping at various inputs.

Matching clipping at 15mV input

Matching clipping at 30mV input

Matching clipping at 55mV input

These show the effect on only one type of clipping in 10mV steps from 15mV to 55mV: 

Input, 15mV to 55mV in 10mV steps

Hard clip, 15mV to 55mV in 10mV steps

Soft clip, 15mV to 55mV in 10mV steps


From the plots above it becomes quite clear that distortion changes very quickly in the beginning and slower later. It may be an idea to use an exponential VCA on the input to get a more even rate of change. This, the actual sound and whether or not the audible volume is similar between hard and soft clipping has to be tested in real life.

Filtering (again)


As explained in the previous post, there is more to the tube screamer distortion (of which this is a variation) than just clipping. It also does selective filtering/gain of the input through the use of two shelving filters, and the low pass filter even changes as gain/distortion is increased, rounding off the curve more at increased soft clipping distortion, see https://www.electrosmash.com/tube-screamer-analysis for more about this.

This change may bring more "life" to the distortion circuit as clipping does not stay static when increasing gain. In the circuit above, gain is done pre-clipping, so clipping just becomes "wider". It may be possible to put an OTA in the feedback circuit instead of the tube screamer's potentiometer and thus keep functionality similar to the TS. Again, this has to be tested in practice to see what sounds good.

And in any case, selecting a cap for LP filtering at a lower frequency than that in the TS should be tested.

Voltage controlled distortion using OTA in feedback


Now, this is pretty cool. Last night I thought about how to replace the variable resistor in the feedback circuit of the TS with an OTA. Today I experimented a little and came up with something that seems to work fairly well.

By controlling the OTA with a 0-2.5V CV, we decide how much current should come out of it, which is exactly what changing the resistance does. I was able to find component values that gives fairly good controllability - at 0V CV no current flows through the OTA, and all current in the feedback loop flows through the diodes, giving maximum distortion. At 2.5V CV enough flows through the OTA to turn off the diodes (at least it looks like it).

I am not sure if this is the exact same result as with a potentiometer. Nor am I sure if the filter calculations hold true and if low pass cutoff changes like it does with changing potentiometer resistance. But it is definitely something worth trying.

Changing the CV input resistor to 20k lets us use 0-5V CV btw.

Hard clipping works well too btw, but the OTA cannot be fully off as then no current will flow.

20m input, slight skewing due to 1nF cap in feedback
15mV input, no distortion when OTA CV is 2.5V

Hard clipping, 15mV input


Hard clipping circuit

Voltage controlled input attenuation

One can also control the input, and thus the distortion, using an OTA circuit. The following circuit will let the clipping circuit see an input of around 15mV when CV = 0 and 130mV when CV = 5. CV is offset by R2 to slightly turn on the OTA even in the absence of CV.

At 5V the output is 1.1V which is rather high, but I've chosen to have this as the max and intead limit max distortion in software.

OTA controls input amplitude
At 0V CV output from the OTA buffer is around 20mV and signal distorts slightly. Replace R6 with 3.9k resistor for less distortion if wanted.
At 5V CV output is 130mV and the circuit clips heavily. Output after clipping is around 1.1V


Further work:

Output VCA - output should be around 5V when input to circuit is 20mV (e.g. input is 5V), and it should be possible to amplify output to 150-200% to do max volume in software and allow higher max volume than 5V (inputs may be above 5V when mixing multiple waveforms and  oscillators).


For the XM8 I may also want to look into mixing of dry/wet signal, and inclusion of a bit crusher. (https://en.wikipedia.org/wiki/Bitcrusherhttps://www.reddit.com/r/diypedals/comments/1zck7p/bitcrusher_schematics/) Looking into how the PT2399 works would also be of interest for the global FX. https://www.electrosmash.com/pt2399-analysis