Showing posts with label LP. Show all posts

Tuesday, October 6, 2020

Nyquist and reconstruction filters in practice!

I assume you've heard about the Nyquist sampling theorem? It basically says that you have to sample a signal at twice the sample rate of the highest frequency you want to represent, that's why CDs have a sample rate of 44kHz - to be able to reproduce signals around 20kHz.

You may even have heard that doing so, you are not only able to reproduce an approximation of the original signal - you can reproduce an exact copy.

But have you actually seen this happen in practice? Let me show you! 


Sampling

A/D and D/A conversion is fairly simple in its basic form. Use an ADC and check the signal amplitude/level at set intervals. DAC is the reverse, set the amplitude of the output to whatever you got from the ADC (There is more to it than that for high quality signal reproduction, but for the sake of the discussion, and for the level of accuracy I need this suffices). 

Try this at home, looking at the output on an Oscilloscope and you'll quickly realise that the output looks nothing like the input. It has jagged edges, you can clearly see the height and length of the individual samples as output from the DAC. 

This is because there is one (two) more very important element(s) needed. To prevent aliasing - a higher frequency signal (outside of the audible frequency range) masquerading as a lower frequency one, we need to use a low pass filter before the ADC to remove frequencies that cannot properly be captured, e.g. frequencies above 1/2 of the sampling frequency.

When playing back the signal we need to do the same - as the DAC outputs a stepped signal it will generate lots of higher frequencies as well. By using a filter with the same cutoff - this time called a reconstruction filter - those are removed (once again, this is more complicated in practice for a high quality signal, but let's forget about that for a minute).


Ok, so that all sounds great on paper. Output a stepped signal and apply some magic, and you should get the original signal. But it can't be that easy, right?


Let's look at some photos:


DAC output (top) vs output after reconstruction filter

Here we see the output of a sampled sine wave (top) vs the output after the 20kHz reconstruction filter. It looks amazing! It works for other waveshapes as well of course, though if we were to zoom in on the edges of the triangle wave we would see that it's slightly rounded - this is because the frequencies required to reproduce it faithfully have been removed by the two filters. This is of course not a big deal as we wouldn't hear them anyway. 

Sampled and reconstructed triangle wave, tips are rounded by filtering.


The effect is even more pronounced with square waves which get a clear oscillation at the edges


Increasing the frequency of the input shows that the DAC output no longer resembles the input as closely - it has very few samples per cycle of the sine wave:


Now things start getting strange. Increasing the frequency even further "distorts" the DAC output even more. Remember, Nyquist says that it should be possible to reproduce a sine wave with only TWO samples per cycle. It sounds incredibly strange, but it actually works! Here is a 15kHz signal, filtered at 20kHz. The DAC output looks nothing like the sine wave it is supposed to represent:


Seeing this for the first time blew my mind. How is it even possible?! Well, read up on the theory behind it in Steven W. Smiths awesome book "The Scientist and Engineer's Guide to Digital Signal Processing" (available for free as separate pdfs from his web page) if you want the theory.


Effects of filtering


Now, there are some effects of filtering still present. First, we get some phase distortion, which increases as we approach the cutoff frequency of the filters. Looking at the input and output sines we can see that they don't line up properly:


As far as I know, this is not audible on its own. It WILL however be audible if the signal is mixed back with the original signal (which incidentally is how phasers are made). (PS: The photo is slightly misleading. Some of the apparent phase shift is only a delay between the input and output due to the time it takes for the DSP chain to process the signal. But the phase shift definitely increases as we approach the filter cutoff)

The second effect is that the amplitude (volume) of the output will decrease as we approach the filter cutoff. This is nothing special to this circuit, it's just how filters work - they do not have an absolute cutoff point, instead they gradually attenuate more and more. Having higher order filters with more stages will help - I'm using six poles in mine. High quality reconstruction filters however, do this differently. As we know how the filter affects the amplitude, we can do the reverse in advance - increase the volume of those frequencies. This cancels out the effect of the filter, keeping the volume constant for much longer. I have not bothered with this in my circuit as we're talking about fairly high frequencies anyway.

Thursday, July 23, 2020

PCM player, DAC, PIC32MX and I2S

I have multiple options for a wave player/sampled attack/wavetable oscillator.

- I can add a DAC to the Voice controller and control it directly there - using a I2S Audio DAC will probably give a very high audio quality

- I can make a separate board with the same DAC, an extra MCU and external memory

- I can try to use the DCOs - they already have a 16bit DAC and I think I have exposed enough SPI pins to make it possible to access external SPI memory. This is the cheapest option but the sound quality must be tested.

In any case, when making the Voice board I should leave room for an optional wave card. It doesn't need its own VCA as the DAC should be good enough for volume control as well.


PIC32 and I2S Dac

It seems most Audio DACs these days use I2S for communicating with the host. The PIC32MX (and other low-end PIC MCUs) don't have I2S support built in, but here is something that seems to make it work:

https://www.aidanmocke.com/blog/2018/11/22/i2s/

https://hackaday.io/project/28965-pic32mx-music-box-with-fm-synthesis-and-i2s-dac

https://tutorial.cytron.io/2017/08/13/i2s-pic32mxmz-introduction/


DAC in general

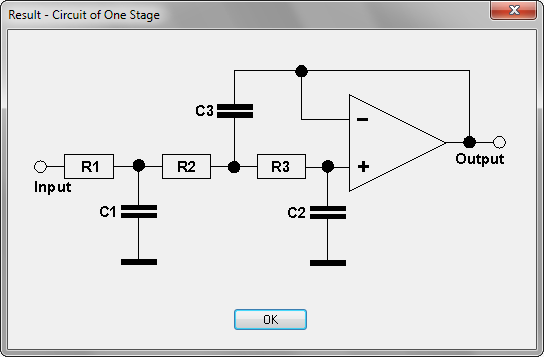
DACs need a reconstruction filter to remove unwanted frequencies. Here is an example that claims to be good:

https://www.analogfilters.com/high-quality-reconstruction-lowpass-filter-for-digital-audio/

Circuit

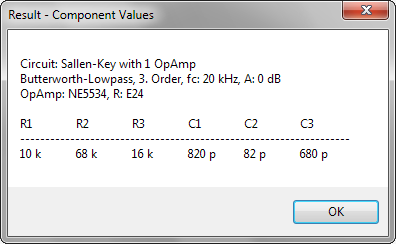
Components

https://www.softwaredidaktik.de/active-filters/download/

Thursday, April 9, 2020

Distortion breadboarded

I've breadboarded two versions of the distortion circuit, both with input attenuation and output amplification to keep a 10Vpp signal almost untouched.

Pre-distortion amplification


First I did the version with pre-distortion amplification. With distortion CV at 0V the distortion circuit sees around 30mVpp. This is heavily amplified to distort.

At the other end, a second OTA amplifies the signal. The output has unity gain for a 10Vpp input when CV is around 2.5V.


Hard clipping circuit with pre and post distortion VCAs

Hard clipping, distortion CV from 0 to 5V


Soft clipping circuit with pre and post distortion VCAs

Soft clipping, distortion CV from 0 to 5V


This circuit worked pretty much as in the simulation. I do have some issues with CV feedthrough so centering is not perfect when distortion changes.

I think I have to bite the bullet this time and introduce AC coupling to get rid of this. Placing a cap in series with the 1k resistor to the distortion op amps negative pole seems to do the trick, and will function as a high pass filter as well (beware though, if not chosen correctly low frequencies will not be distorted, in fact they will be attenutated.

Distortion CV at 0V

Distortion CV at 2.5V, almost full distortion and more than double amplitude

Distortion CV at 5V, full distortion. Signal is clipped unevenly by the op amp.

Distortion CV at 2.5V, almost full distortion


Distortion CV at 5V. Very similar to half distortion.

It seems that the real life circuit sees a higher maximum input gain than the simulation. Full distortion is reached much earlier. Also, compared to the OTA in feedback loop version below, the CV response seems exponential, not linear.

OTA and parallel resistor in feedback loop


Then I tried breadboarding the OTA-in-feedback version. I had lots of trouble and could not get it working as expected at all. After much experimentation I ended up with a well functioning circuit. I then started documenting the changes, and realised what was going on: I had inadvertently put a 33k resistor in the feedback of the distortion op amp. This works in tandem with the signal fed back through the OTA, so it completely changes the amount fed back.

As a bonus, the CV control of this version seems to feel much more linear - in the other version all changes came at the start of the CV and very little later. Also, the soft clipping amplitude seems to stay very close to 5V, so in some ways it feels more "correct", the volume doesn't increase as much.

After discovering my error I simulated this circuit too and it works as on the breadboard.

PS: The distortion CV now works in reverse: 0V is max distortion, 5V is no distortion. Unity gain through the circuit is the same as above, approximately 2.5V.

OTA and 33k resistor in feedback of op amp

Soft clipping

Hard clipping, starts very soon after turning the distortion pot.


OTA in feedback loop without the 33k resistor


Now I went back to the circuit that I was TRYING to breadboard and looked at the simulation again. I think I got lost because I couldn't get it working the way I wanted to. Looking at my previous Distortion post, I realised that the hard clipping starts much later, and so the output has a higher amplitude when clipped than in my happy accident.

I then changed parts back to my original design and did some tweaking, resulting in this circuit:


OTA and no resistor in feedback. Soft clipping version


OTA and no resistor in feedback. Hard clipping version
Soft clipping

Hard clipping

Results on the breadboard for versions with OTA in feedback loop


The circuit on the breadboard have some small differences from the simulated one. The output amp uses a 120k resistor instead of a 150k to get unity gain at 2.5V CV. I left the 180pF (Low pass filter) in place, and used 1k pots instead of the resistors to ground on the OTA inputs (except for the distortion OTA in the version without resistor in the feedback.

The potentiometer settings used were:
VCA pot: 620 ohm to ground on negative input, 365 ohm to ground on positive input
Distortion pot: 479 ohm to ground on negative input,  512 ohm to ground on positive input in distortion OTA. For the version without a feedback resistor I breadboarded it as in the schematics.


All oscilloscope pictures are of a 473Hz 10Vpp input wave. Vertical resolution is 5V/square. Output VCA CV is at 2.5V which according to the simulations should give us unity gain for undistorted signals.

First, the circuit with both an OTA and a 33k resistor in the feedback, soft clipping:


Triangle wave, soft clipping selected and distortion CV is at max (5V) meaning least amount of distortion. Output is equal to input
Same as above but with distortion CV at 0V, meaning max distortion. Amplitude only changes slightly but output is heavily distorted.


Hard clipping:

Same as above, but this time with hard clipping. 5V distortion CV, No signs of clipping and still unity gain.

Again same as above, hard clipping, but with 0V distortion CV/max distortion. Heavy clipping and just slightly higher amplitude.

Without 33k resistor in feedback

Now for the circuit without the 33k resistor in the feedback loop. This didn't work very well, the clipping became very asymmetrical. This may be due to the high attenuation of the input signal? I tried replacing the resistors at the positive and negative OTA terminals with a 1k resistor but that didn't change things. Maybe an HP filter capacitor would help?

Soft clipping:

Soft clipping, max distortion CV. The signal passes unclipped but with the output VCA CV at 2.5V the amplitude is only around 7Vpp, and also not symmetrical around 0V.

Soft clipping, no distortion CV. Heavy but unsymmetrical clipping. Amplitude is almost the same as for the previous circuit.
Hard clipping:

Hard clipping, max distortion CV. Same as soft clipping, no surprises there.

Hard clipping, no distortion CV/max clipping, looks very similar to hard clipping for the other circuit except that the clipping is unsymmetrical.


Pre and post OTA breadboarded


510 ohm resistors instead of trimmer for version with 33k in feeback

I tried replacing the 1k trimmer pot on the distortion feedback OTA with two 510 ohm resistors to ground. That gave the following result:


The input is now distorted, meaning the OTA sees a too high voltage.

By measuring the position of the trimmer potentiometer for the distortion feedback OTA when signal does not clip at 10Vpp input (750 ohm), and using the resistor divider equation, I found that the distortion OTA sees +/-165mV. Going the other way, a resistor divider with 15k and 510 ohm will yield the same result. Here I have done the change:


When tweaking the potentiometer I could see that clipping starts right after I started turning the potentiometer. Since there may be production differences, an even smaller input resistor would give a litte room for trimming the input digitally. Here is the effect of 12k, a slightly smaller amplitude:


I also tried replacing the trimmer in the VCA OTA part, that heavily offset the output. It could be possible to use AC coupling here, but we would still get uneven clipping in the VCA at high gain, so it might be best to use a trimmer.

I also did see a slight distortion at minimum distortion CV, but this is probably not related to clipping.

510 ohm resistors in the simulation

In simulations though, it does not work very well:

Signal is much smaller than in the breadboarded circuit when no distortion CV is applied.


I am not sure I will do any more work on this now, I have a well functioning circuit that I will test with some "real" signals instead later (the one with the extra 33k resistor in the feedback, 12k on the input and 120k on the output).

Tuesday, March 31, 2020

Distortion (clipping)

Seems I can't stop working on my synth these days. There are two major parts missing from my synth voice cards: Digital playback and pre-filter distortion. I am not sure about the need for the last one, so I decided to build that first.

Googling distortion circuits I came across a resource that I have read long ago and forgotten about: Design your own distortion.

This page gives a great step by step introduction to two types of distortion: Hard and soft clipping. It also has some on filtering and tone control but it contains some errors (50nF cap in distortion does not give a lower frequency of 31Hz but 3.1kHz, the shown circuit will not give any distortion and indeed very little gain for frequences lower than 3.1kHz).

I decided to try simulating the circuit in LTSpice (with +/-15v supply lines) before breadboarding it, to get a feel of what it is doing.

Hard clipping

The hard clipping part of the circuit is easy. Two parallel diodes in reverse order from signal to ground after a buffer or similar that disconnects it from the input.

Hard clipping at around 750mV

What is going on? When the input signal, and thus the voltage across the diodes reaches the forward voltage drop of one of the diodes, it switches on, sinking the current to ground. This effectively cuts off the peaks of every wave cleanly. A fairly normal diode voltage drop is around 0.75V, meaning the signal is clipped at 0.75V. The amount of clipping is adjusted by attenuating the input (assuming a +/-5v input) to where you want the clipping to occur.

If one wants a higher clipping point it is also possible to connect diodes in series, going from 0.75V to 1.5V to 2.25V etc.

Hard clipping with series diodes, clips at around 1.5V


Soft clipping

This is slightly more involved. Soft clipping means that instead of brutally chopping off the wave tops, they are rounded off. Soft clipping can be achieved by placing two diodes in parallel / reverse order in the negative feedback loop of an op amp, parallel to the feedback resistor.

I first simulated inverting amplification instead of the non inverting "tube screamer" version on the web page because I could not get that one working due to the HP cutoff error in the article.


Here is what I think is going on, and why this is different to hard clipping:

When the voltage across the feedback resistor Rf is low, the diode will be turned off. Current only flows through Rf. Increasing the voltage (and thus current) gradually switches on the diode. Some of the current starts flowing through the diode while some still flows through the resistor.

Soft clipping currents - the original input current (red) is equal to the sum of the current through the resistor (blue) and diode (green). The diode only starts conducting after a while, but when it does almost all current goes through it.

Abiding to Ohms law, the opamp output voltage is still the current flowing through the resistor times the resistance, but as some of the current required to keep the two opamp inputs equal now flows through the diode, the output voltage is less than the input voltage (given a unity gain configuration where Rin = Rf).

As the input current increases, more and more current flows through the diode, and the amount of current flowing through the resistor flats out, cutting off the top of the input waves.


Another interesting thing to note is at what voltage the cut happens at is affected by the resistance of Rf. With a larger resistance, current starts flowing through the diode earlier (as its "resistance" is lower). Thus, the voltage across the resistor when it starts clipping is also lower, meaning the output is clipped more than with a lower value resistor.

Example values for a +/-1v input are clipped peaks at:

550mV for 1k,
450mV for 10k and
355mV for 100k.


A +/-5v input has peaks at 650mV and +/-15v peaks at 712mV (at 100k?)

Soft clipping with 1k resistor in feedback loop

Soft clipping with 10k resistor in feedback loop

Soft clipping with 100k resistor in feedback loop


Currents with 1k resistor, total current is 1mA

Currents with 10k resistor, total current is 100uA. A proportionally larger part of the input current goes through the diode (the diode "resistance" is still the same so it's easier for the current to go this way) and the output current is clipped earlier.

Currents with 100k resistor, total current is 10uA, an even larger part of the current goes through the diode


The non-inverting version probably works in the same way.

I first had issues getting the non-inverting circuit from Design your own distortion to work because of the HP cutoff error, but finally I found and was able to simulate a similar non-inverting circuit, this one:

https://electronics.stackexchange.com/questions/473989/need-help-designing-and-implementing-an-op-amp-based-distortion-circuit

Non inverting circuit, increased value of filter cap, meaning a lower high pass filter point distorts the wave.
The same circuit as above but without filter cap. The clipping part is more visible here.


The slight skewing is because of the cap in the feedback loop. Gain is (10k + 220) / 220 = 46

It also explains a very important thing: The guitar signal amplitude is 40mV, nothing near the 1-5V I've been experimenting with so far. Taking this into account I was able to simulate a +/-15v version of the original circuit, but WITHOUT the 50nF capacitor in series with the 1k input resistor on the positive terminal of the op amp, an the resistor connected to GND instead of the negative supply (in the original circuit it is connected to ground, but ground is the negative supply as this is a 9V circuit). See the filter section below for an explanation of why removing the 50nF cap was necessary (the cap value is simply wrong due to a calculation error in the article).

Further more, Rf must be much larger than 1k to get distortion, without this all the current flows through Rf and none through the diodes so no clipping happens. I've been working with 30k.

Working soft and hard clipping. The input (green) is multiplied by 31 to see how it matches (the non inverting opamp configuration here amplifies the input 31 times).

I have also simulated various types of diodes for the soft clipping circuit, more about this in a separate post.

Filtering

The webpage on top also talks a lot about filtering. The original article is about distortion for guitars and says that one should aim for keeping frequencies from 40Hz to 30kHz (NB: There is a serious error in the HP filter calculations in the article, see the end of this section). It may be different for a synth but that's a good starting point.

The article discusses high pass and low pass filtering in a non-inverting amplifier. The chosen circuit is often referred to as shelving filters elsewhere, it is not the most common circuit in examples on the web.

Shelving filters actually have two parts, the "normal" high or lowpass filter, and then a second part where it flattens out again at a lower or higher frequency with lower gain, but where the gain stays at this level instead of continuing to drop off, letting all frequencies below (for HP) or above (for LP) pass. - see http://www.linkwitzlab.com/filters.htm#5.

Here are the sub-circuits and formulas needed for calculating the 3dB points:

The full circuit (NB: Other component names than the original):


The second parts of the shelving filter: Both these have gain = 1. To find the frequencies, replace R1 in the HP formula with (R1 + R2), and R2 in the LP formula with (R1*R2) / (R1 + R2).

For example:

Given the values
R1 = 1kOhm
R2 = 10kOhm
C1 = 50nF
C2 = 470pF

For the HP filter:
HP filter frequency: 3.1kHz (Gain = 11)
Lower frequency: 290Hz (Gain = 1 for all freqs below this)

For the LP filter:
LP filter frequency: 33.9kHz  (Gain = 11)
higher frequency: 373kHz (Gain = 1 for all freqs above this)

PS: In the "Design your own distortion" article HP frequency capacitor selection calculation is wrong. 1 / (2 * PI * 1000 * 40) is not 0.039uF, it is 3.98uF. This explains my inability to get the distortion working without removing the cap during my simulation - I simulated using a 400Hz sine wave, this is well below the 3.1kHz HP cutoff, meaning it has unity gain and is not at all distorted.

In general, there is a lot of info about filtering missing from the "Design your own distortion" article. The Tube Screamer analysis at https://www.electrosmash.com/tube-screamer-analysis has a much better description, talking about how the filter frequencies are affected by changes in the gain of the distortion and how bass frequencies are passed undistorted (but also un-amplified).


When deciding on component values, one first chooses the gain, then calculate the necessary capacitors.

See also


https://www.premierguitar.com/articles/diode-stew-1
https://sound-au.com/articles/soft-clip.htm
https://anasounds.com/od-disto-fuzz-differences/
https://www.electrosmash.com/tube-screamer-analysis